What to know
The eTOPxxC series, eTOP300 series and eTOP04C operator panels have an integrated USB port that can be used to programmer the device trough an USB flash drive.
Using Designer programming software the application and the firmware files to be used into the unit can be downloaded into the USB flash drive, it is also possible to upload an application from the USB flash drive.
Note: the USB flash drive must be FAT or FAT16 formatted to be compatible with Designer series operator panels, the maximum size supported by these formats is 2GB.
What to do
Programming the panel through the USB flash drive
The download operation trough an USB flash drive is performed in two steps: the download of the application into the USB flash drive and then copy of the USB flash drive content into the operator panel.
Download
- Open in Designer the application to be downloaded into the operator panel.
- Plug the USB flash drive into the pc.
- In Designer select Transfer > Transfer > Download to USB
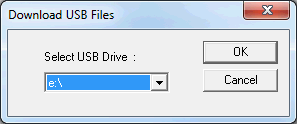
- The system prompts for the drive (image below). Select the USB flash drive and confirm with OK.

- The Update Firmware to USB dialog is displayed by the system (image below), if there is no specific requirement to have the Firmware files downloaded into the USB flash drive we suggest to skip this operation by clicking on the Cancel button. If the download of the Firmware files into the USB flash drive is required (see note below) select the needed files and click on the Update button.
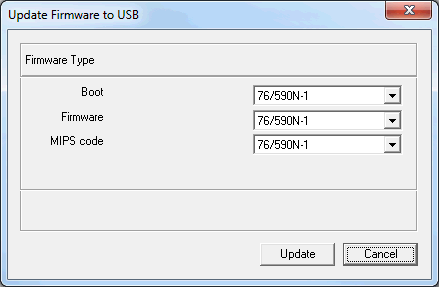
Note: the Firmware files should not be downloaded into the USB flash drive unless this is necessary. The download is necessary in case the operator panel internal memory has been formatted, in this case make sure the Firmware files version is the same of the Firmware already installed into the operator panel. The download of the Firmware files is needed if an upgrade of Firmware is required on panel, in this case please contact our Technical Support department at techsupp@exorint.it to verify the correct Firmware version to be used with your unit.
Copy of the USB flash drive content into the operator panel.
- Make sure the panel is in Configuration Mode and plug the USB flash drive into the operator panel.
- Keep pressed the Left Arrow key for some seconds the Memory Setup menu will be displayed.
- Make sure the USB flash drive is correctly recognized by the panel by checking the dot on the USB flash drive button that, if recognized, is black, as shown in the picture below.
- Start the copy of the USB flash drive content into the Panel internal memory by pressing on the apposite button shown in the picture below recognizable from the icon representing an arrow going from the USB symbol to the CHIP symbol.
- Once the copy operation has been completed exit from the Memory Setup menu using the Clear "// " button or the button.


Note: the eTOP04C panel model uses a simplified textual Memory Setup menu, the copy procedure in this case is the following: from the Memory Setup menu select the Copy voice using the Arrow keys to move the cursor and confirm the selection with Enter button. Select then Project USB -> Panel Memory voice, confirm with Enter and then start the copy with Up Arrow button as reported also in page.
Read the application from the USB flash drive
As per the programming of the panel the operation is composed by two separate steps: the copy of the Panel internal memory content into the USB flash drive and then the Upload of the USB flash drive content in designer.
Copy the content of the Panel internal memory into the USB flash memory
- Make sure the operator panel is in Configuration Mode and plug the USB flash drive into the operator panel.
- Keep pressed the Left Arrow key for some seconds the Memory Setup menu will be displayed.
- Make sure the USB flash drive is correctly recognized by the panel by checking the dot on the USB flash drive button that, if recognized, is black, as shown in the picture below.
- Start the copy of the Panel internal memory content into theUSB flash drive by pressing on the apposite button shown in the picture below recognizable from the icon representing an arrow going from the CHIP symbol to the USB symbol.
- Once the copy operation has been completed exit from the Memory Setup menu using the Clear "// " button or the button.
- Open Designer.
- Plug the USB flash drive containing the files copied from the operator panel into the pc.
- In Designer select Transfer > Transfer > Upload from USB
- The system Upload Project dialog is shown, provide the Project name and the Location where to save the application.
- The system prompts for the drive (image below). Select the USB flash drive and confirm with OK to start the Upload operation.


Note: the eTOP04C panel model uses a simplified textual Memory Setup menu, the copy procedure in this case is the following: from the Memory Setup menu select the Copy voice using the Arrow keys to move the cursor and confirm the selection with Enter button. Select then Project Panel Memory -> USB voice, confirm with Enter and then start the copy with Up Arrow button as reported also in page.
Upload

Applies to
Designer 6.07 or newer
eTOPxxC serie operator panels (FW70), eTOP300 serie operator panels, eTOP04C


