What to know
For Exor Industrial Computers eTOP-EPC, eTOP-IPC and Industrial Monitors eTOP-MON series,
a specific touch calibration utility is available if calibration of the touch screen if required.
What to do
Launch the PenMount Control Panel clicking on the desktop icon, system try icon or from the Start Menu of windows.
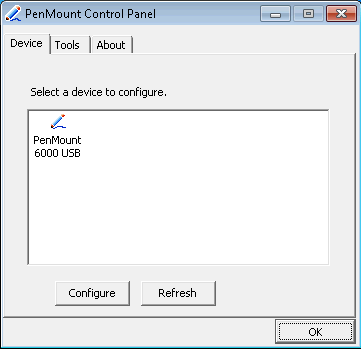
The system lists the detected devices into the Device window.
Select the device to be calibrated then click on “Configure” button.
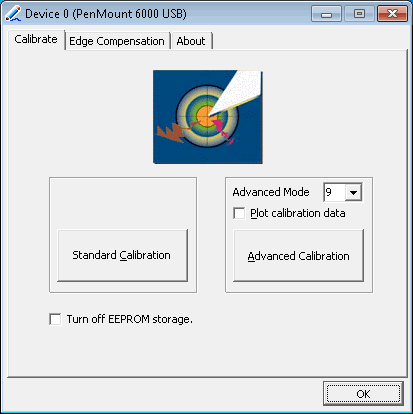
Calibrate Tab allows the selection of two calibration mode:
Standard Calibration
This procedure is simpler, it uses 5 calibration points.
Use finger or stylus to touch the red squares displayed by the system in sequence.
To skip, press ‘ESC’.
Note: If the result of the calibration procedure is not accurate as desired please try the Advanced calibration procedure.
Advanced Calibration
Advanced Calibration is a more accurate calibration procedure that uses 9, 16 or 25 points to effectively calibrate touch panel.
It can be particularly useful in case of aging touch screen components where the standard calibration does not result in a good touch linearity, the older is a touch screen the highest number of calibration point may be required to get a good calibration.
Use finger or stylus to touch the red squares displayed by the system in sequence.
To skip, press ‘ESC’.
Plot Calibration data option allows to evaluate the linearity of the touch screen component as result of the calibration procedure by displaying a comparison graph between the ideal linearity (black line) and the touch screen component linearity calculated by PenMount’s application program (blue line).
Note: For an optimal accuracy we suggest to use a stylus for the advanced calibration procedure
Turn off EEPROM storage
This option, if selected avoids the store of the of the Calibration data into the Controller.
Appendix: What to do if calibration seems not work
In case you notice a progressive error in the calibration, moving from the left edge to the right edge of the screen,
the problem may not be related to a wrong calibration but due to the fact that in the graphical settings the display is configured for use as an extended display.
Please follow this procedure to disable the extended display option. To easily perform this operation we suggest to connect a mouse to the Computer
- Right click on desktop, then select "Graphical properties" from context menu.
- "Intel Graphics and Media Control Panel" window will be displayed. Select, on the left side of the window, Display > Multiple Displays.
- Under "Operating mode" on the right side of the window, select "Single Display".
- Click on "Apply" and confirm when the system ask to save the changes.
- Select OK and close the window.
Applies to
eTOP-MON, eTOP-EPC, eTOP-IPC


